Defining VLAN Pool
A pool represents a range of traffic encapsulation identifiers (for example, VLAN IDs, VNIDs, and multicast addresses).
A pool is a shared resource and can be consumed by multiple domains, physical or virtual.
A leaf switch does not support overlapping VLAN pools. You must not associate different overlapping VLAN pools with the same virtual domain.
The two types of VLAN-based pools are as follows:
Dynamic pools: Managed internally by the APIC to allocate VLANs for endpoint groups (EPGs). For example, a vCenter Domain can associate only to a
dynamic pool.
Static pools: The EPG has a relation to the domain, and the domain has a relation to the pool. The pool contains a range of encapsulated VLANs and
VXLANs. For static EPG deployment, the user defines the interface and the encapsulation. The encapsulation must be within the range of a pool that is
associated with a domain with which the EPG is associated.
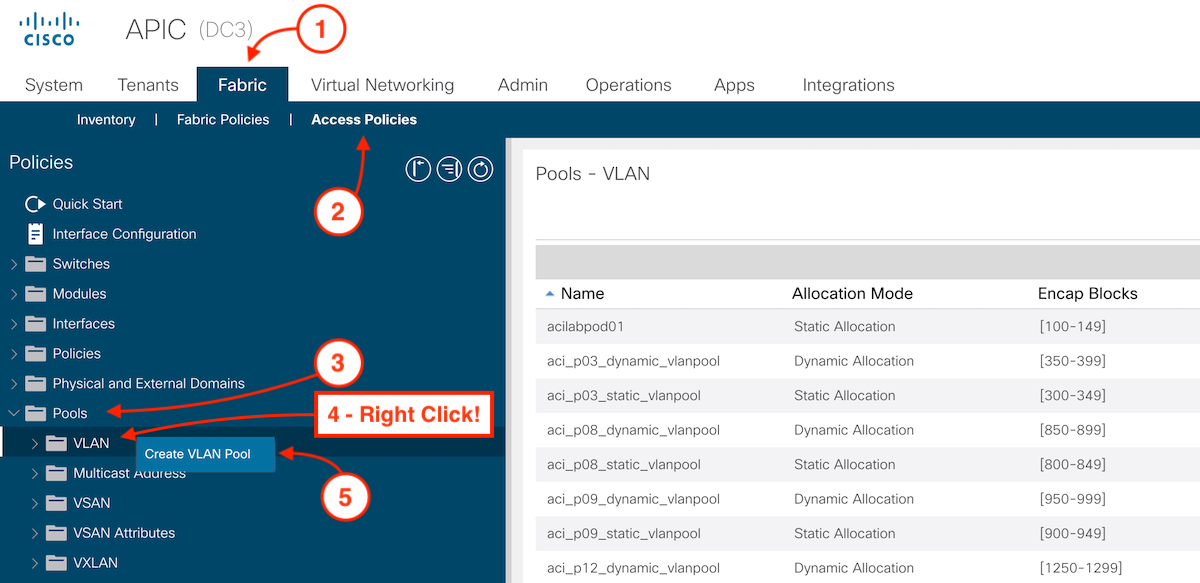
Step 1 - Navigate to VLAN Pool in Access Policies
Navigate to Access Policies to create a VLAN pool for a physical domain:
- Click Fabric
- Click Access Policies
- Expand Pools by clicking the toggle arrow (>)
- Right-click on VLAN
- Click Create VLAN Pool

Step 2 - Create Static VLAN Pool
In the Create VLAN Pool popup:
-
Name the VLAN Pool:
aci_p10_static_vlanpool
- Ensure Static Allocation is selected
- Then click the plus sign (+) button to add your VLAN pool range

After clicking on the the plus sign (+) then you can enter your VLAN range for this pool:
- VLAN Range:
1000
-
1049
- Click OK

- Then click Submit
ACI Object
This is the response from the fabric as to what is configured.
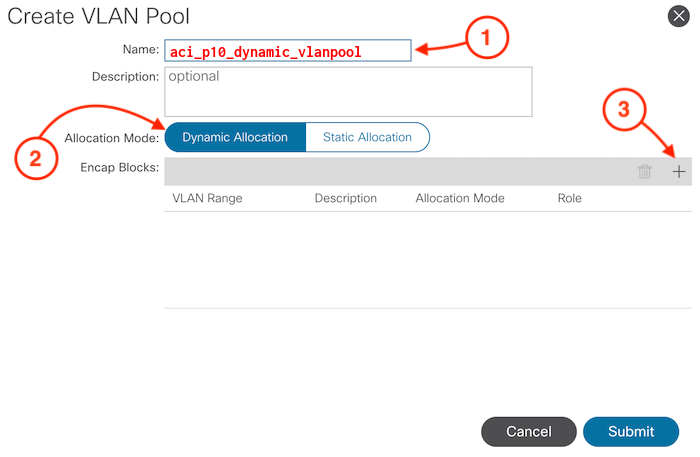
Step 3 - Create Dynamic VLAN Pool
Repeat the above process to create a VLAN Pool for a virtual domain.
While still under Access Policies, under Pools:
- Right-click on VLAN
- Click Create VLAN Pool
- Name the VLAN Pool:
aci_p10_dynamic_vlanpool
- Ensure Dynamic Allocation is selected
- Then click the plus sign (+) button to add your VLAN pool range

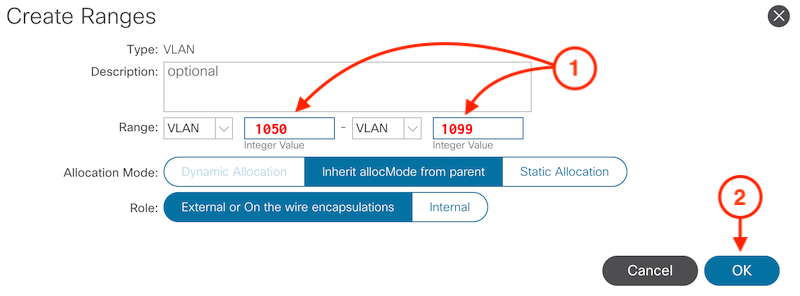
After clicking on the the plus sign (+) then you can enter your VLAN range for this pool:
- VLAN Range:
1050
-
1099
- Click OK

- Then click Submit
ACI Object
This is the response from the fabric as to what is configured.
With your VLAN Pools created for physical domains and virtual domains created, continue to the next section where you will start creating domains.


