Now that you have Multi-Site Schemas configured across ACI fabrics and VMs running, it is time to test the connectivity between the VMs across the ISN.
In this section, we will apply some concepts from earlier in the lab to attach VMs to the proper VMware vDS port-group that was created by the MSO
controller.
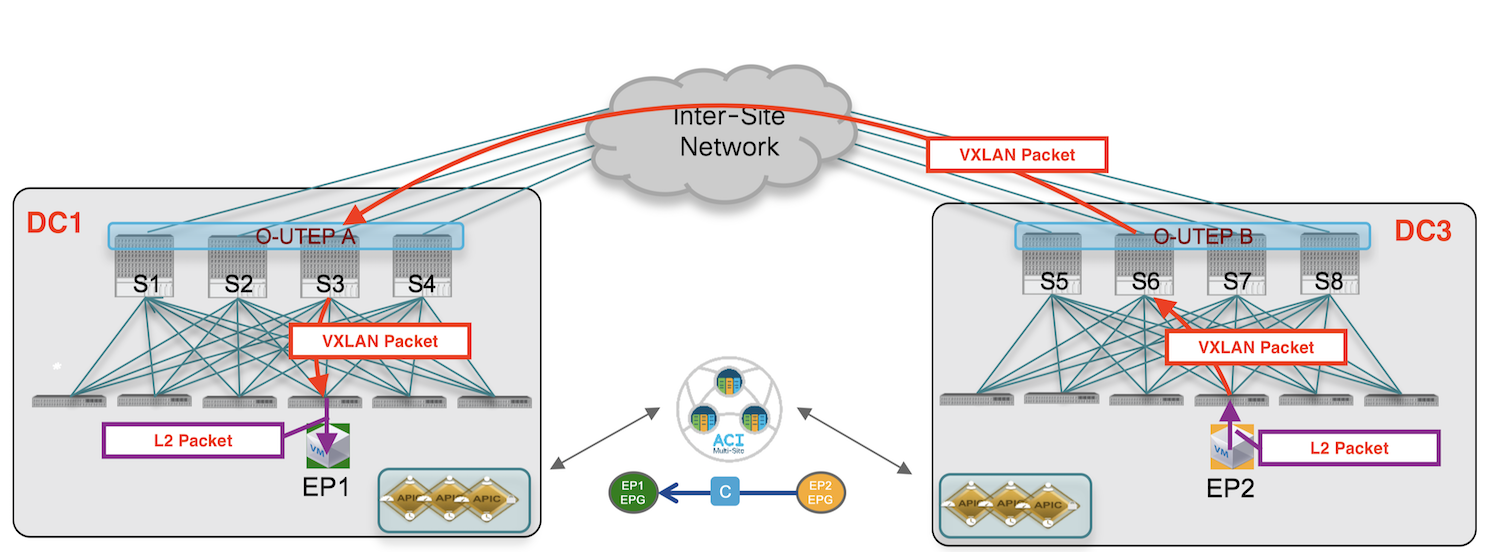
Since these endpoints will reside in the same EPG, no contract was required when creating the Schema Template. However, if you use MSO to create various
EPGs with
endpoints in different EPGs, like normal from the APIC point-of-view, hosts in different EPG will not be able to communicate
between each other unless there is a contract defined between them.
Step 1 - Set Management Port Group to Network Adapter 1
Click the terminal icon on the left to open the lab ansible host cl-srv1 Username: pod3u1 Password: cisco.123
Log to the lab ansible host and run the playbook bellow
    PLAY [pod3] *******************************************

    TASK [cl-vm/set_msite_vm : get VM info] ****************
    TASK [cl-vm/set_msite_vm : Set port group] *************
    TASK [cl-vm/set_msite_vm : Get portgroup info] *********
    TASK [cl-vm/set_msite_vm : Change port group policy] ***
After we have modified the ip address and added the static route, we need to restart the network services
in order to take effect the previous changes.
systemctl restart network
Step 5 - Login to POD03-DB-SRV
Click on the console ICON on the left to start the connection to the 10.0.145.21 Username: root Password: cisco.123
Step 6 - Ping your DB VM's Default Gateway (192.168.103.1)
From your POD03-DB-SRV VM, ping the anycast gateway that has been provisioned to ACI through the MSO Schema.
ping 192.168.103.1 -c 3
root@pod03-db-srv-01 ~]#ping 192.168.103.1 -c 3
PING 192.168.103.1 (192.168.103.1) 56(84) bytes of data.
64 bytes from 192.168.103.1: icmp_seq=1 ttl=64 time=0.174 ms
64 bytes from 192.168.103.1: icmp_seq=2 ttl=64 time=0.193 ms
64 bytes from 192.168.103.1: icmp_seq=3 ttl=64 time=0.164 ms

--- 192.168.103.1 ping statistics ---
3 packets transmitted, 3 received, 0% packet loss, time 1999ms
rtt min/avg/max/mdev = 0.164/0.177/0.193/0.012 ms
Step 7 - Ping your Remote Site VM (POD03-RMT-SRV-01)
From your POD03-DB-SRV VM, ping your POD03-RMT-SRV-01 that resides in the remote data center (dc1).
Terminal
ping 192.168.103.11 -c 3
root@pod03-db-srv-01 ~]#ping 192.168.103.11 -c 3
PING 192.168.103.11 (192.168.103.11) 56(84) bytes of data.
64 bytes from 192.168.103.11: icmp_seq=1 ttl=64 time=0.174 ms
64 bytes from 192.168.103.11: icmp_seq=2 ttl=64 time=0.193 ms
64 bytes from 192.168.103.11: icmp_seq=3 ttl=64 time=0.164 ms

--- 192.168.103.11 ping statistics ---
3 packets transmitted, 3 received, 0% packet loss, time 1999ms
rtt min/avg/max/mdev = 0.164/0.177/0.193/0.012 ms