Step 1 - Navigate to Application Profiles in the Tenants Tab under Tenant
Create an Application Profile by:
Tenant : aci_p03_tenant
Right Click on Application Profiles
Step 2 - Create Application Profile
In this step, we will be creating two EPG's named aci_p03_epg_web and aci_p03_epg_app and their respective contract in order for them to be able
to communicate with eachother. We will be leveraging the Application Profile Quick Start for ease of use. The idea behind of the
Application Profile Quick Start is the user can create these profiles within a single screen.
The first step is to named the Application Profile aci_p03_ap. It is important not to click Submit
until we have finished creating the entire Application Profile.
Name the of the Application Profile
aci_p03_ap
Click the plus sign (+) button
Step 3 - Create WEB EPG
During this step, we need to input the following parameters:
Name of the EPG:
aci_p03_epg_web
BD: This is the BD that is going to be associated to the EPG. In this step we will be associating the aci_p03_bd_web
to aci_p03_epg_web
Domain: In this particular example, we will be associating the domain to our VMM Domain aci_p03_dc3_vds.
Provided Contract: common/web-ltraci-2143
Consumed Contract: We need to create the contract in order for our EPG's to communicate.
Step 4 - Create Contract
Name:
aci_p03_con
Click the plus sign (+) button
Step 5 - Create Subject
Name:
aci_p03_sub
Click the plus sign (+) button
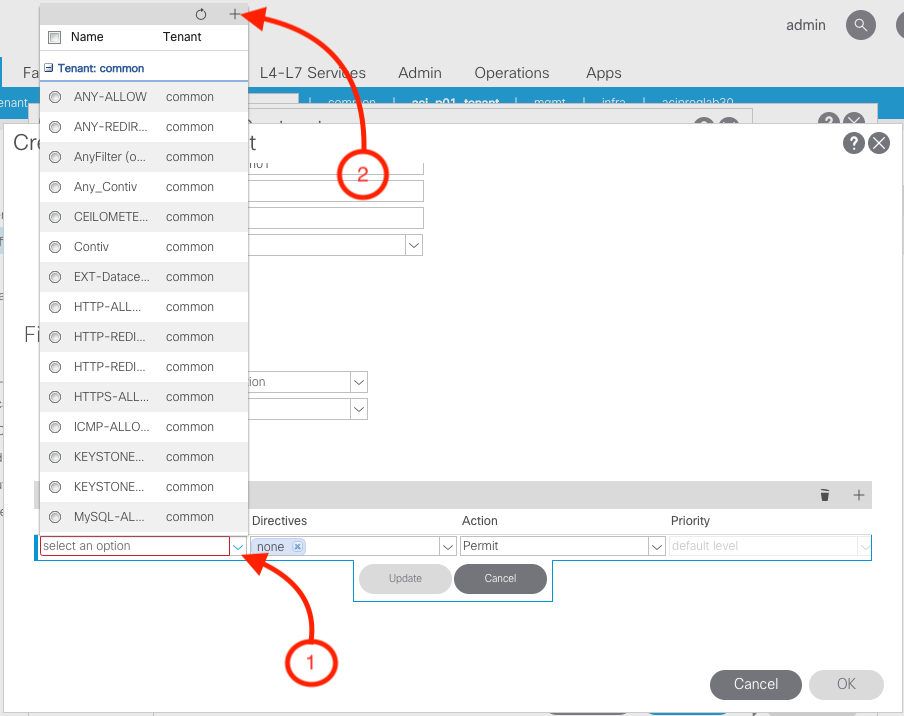
In order to create the filter you need to click on the + sign as shown in
the below picture.
In the filter name, you will enter the name of the filter as
aci_p03_fil
Then click the + sign to define the filter entry
Name: icmp
EtherType: IP
IP Protocol: icmp
Click on Update to add the entry
Then click Submit
Once you clicked submit, the GUI will take you back to the Create Contract Subject page where you will need to click update and OK. Then
the GUI will take you to the Create Contract page where you need to click Submit.
After you have click submit from the Create Contract the GUI will take back to the Create Application Profile. Your screen should look like
the following picture.
Make sure to click Update
Alert
Don't click Submit. We will do that after the next step
Step 6 - Create APP EPG
Click the plus sign (+) button to add another EPG
During this step, we need to input the following parameters:
Name :
aci_p03_epg_app
BD : This is the BD that is going to be associated to the EPG. This steps we will
be associating the aci_p03_bd_app to aci_p03_epg_app
Domain: In this particular example, we will be associating the domain to our VMM
Domain aci_p03_dc3_vds.
Provided Contract, aci_p03_con
will actually need to be typed in for this field, then selected since it was just created in the previous EPG.
Alert
If the newly created contract is not showing up in the pulldown menu. Please continue without selecting the contract and you will add it in Step 6 Add Contract
For the aci_p03_epg_app, we are using a Provided Contract, this is needed because we need a bi-directional relationship between
aci_p03_epg_app and aci_p03_epg_web
Click Update
Click Submit
Step 6 - Add Contract
Optional
Only needed to do these steps if you were not able to add the contract in the previous step
Expand Tenant : aci_p03_tenant
Expand Application Profile: aci_p03_ap
Expand EPG: aci_p03_epg_app
Click on Contracts
Click on the Toolbox
Add Provided Contract
Select aci_p03_con
Clink Submit
Step 7 - Application Profile Verification
After clicking submit the newly Application Profile would be displayed. It will show the Application Profile with your
name aci_p03_ap and the two EPGs created.
Before proceeding make sure to verify the creation of this tenant construct.
ACI Object
This is the response from the fabric as to what is configured.
ACI Object
This is the response from the fabric as to what is configured.
ACI Object
This is the response from the fabric as to what is configured.
ACI Object
This is the response from the fabric as to what is configured.
ACI Object
This is the response from the fabric as to what is configured.
Verify your work
Step 8 - WEB Route Verification
If you haven't closed the browser window with the console to the N9K-L3Out-01-16.ecatsrtpdmz.cisco.com, you should be able to use the same
window. If not, then click on the console ICON on the left to start the connection to the N9K-L3Out-01-16.ecatsrtpdmz.cisco.com. We
are using as the external L3 connection. Username: acipod03 Password: cisco.123
show ip route 10.0.144.16
N9K-L3Out-1-16# show ip route 10.0.144.16
IP Route Table for VRF "default"
'*' denotes best ucast next-hop
'**' denotes best mcast next-hop
'[x/y]' denotes [preference/metric]
'%' in via output denotes VRF

10.0.144.16, ubest/mbest: 1/0
    *via 10.0.3.0, Eth 1/3, [110/20], 00:04:49, ospf-11, type-2